Create an item
Store a set of attribute values
When editing a design, you can create an item of it. This lets you store a set of data values for the attributes defined by it. When editing an interface, you create an item of any design that implements it. To get started, select Create item in the app bar.
The Item Creator will appear. Perform the following steps to create a new item containing the data you supply. All fields marked with an asterisk * require a value to continue.
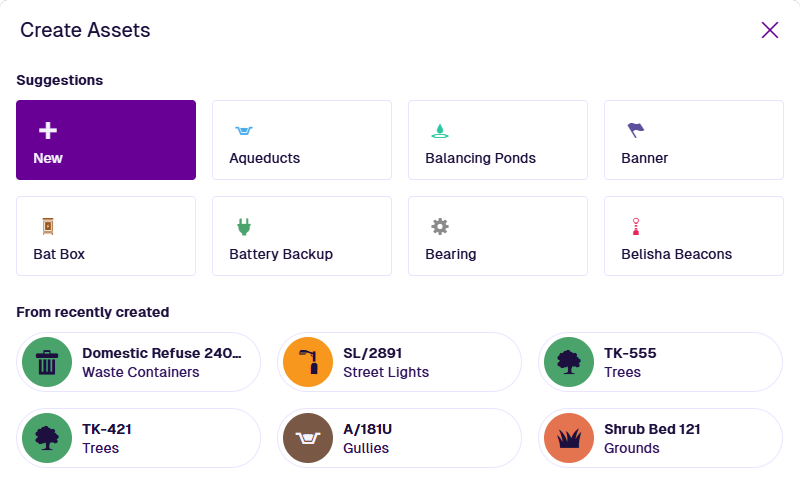
Choose a design or recent item
First, choose the design of the new item. Either pick one of the suggestions or select New to pick another design from a searchable list.
The available designs are determined by the context that you started from. If you were working with an interface, only designs that implement the interface will be available.
Alternatively, choose a recently created item to use as the basis for a new one. The new item will use the same design and initially contain the same attribute values, which you can then change as needed.
Advanced settings
Before continuing, select Advanced settings (top-right) to change any of these optional settings:
-
Item form - if any item forms exist for the new item's design, the most suitable one will be loaded automatically. Alternatively, choose the one you want to use. This affects the layout and visibility of the attribute fields shown when creating the item.
-
Collection - change the collection that the new item will belong to (usually Live by default). The new item's design determines which collections are allowed. If set to Template, required attributes can be left blank on the new template item if necessary.
-
Open on create - enable this to view the new item in a new browser tab, immediately after its creation.
Parents
This is an optional step, which lets you form a parent-to-child link from an existing item to the new item. It involves adding the new item to a compatible Link attribute on the existing item.
For example, imagine creating an item of the Benches design. It's located in Jephson Gardens park, so it needs adding to the Assets Link attribute on the corresponding Grounds Site item. The attribute is compatible because it points to the Assets interface, which is implemented by the Benches design.
Open the Parents dropdown and select Add parent:
-
Design * - choose from the list of designs containing a compatible Link attribute.
-
Attribute * - after choosing the design, specify the Link attribute to use.
-
Item * - after choosing the design, specify which of its items should link to the new item. To browse for items on the map, select the button in the search box to use the map picker.
Select Add to finish. You can add any number of parents.
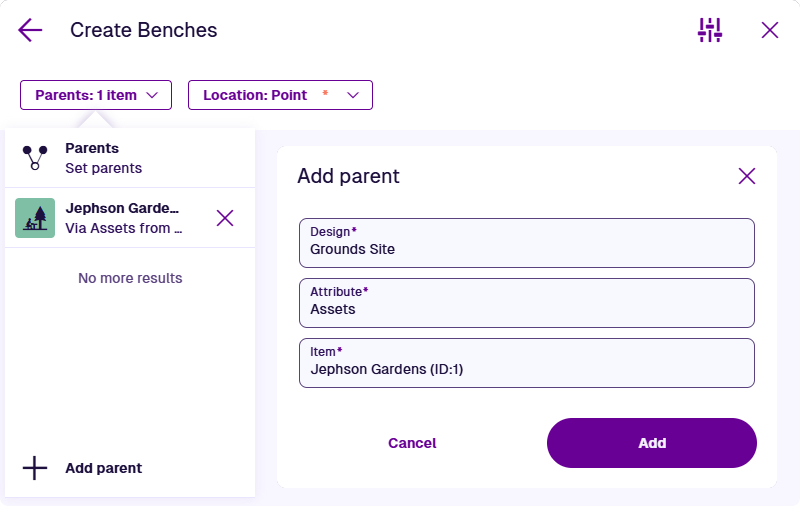
This is commonly used to link a new activity to a parent asset, or a new component to a parent asset head.
Location
This step may be required. If the Location dropdown is marked with an * asterisk, a value must be supplied. This is because the new item's design (or an interface it implements) has the Requires geometry property enabled.
Open the Location dropdown and select Geometry. Use the Geometry Editor to draw the new item's geometry on the map. This will typically be a point, line or polygon, depending on the new item's design.
Activities typically require geometry but can inherit it from a parent asset if none is set. This happens if you perform a bulk action to create multiple activities against multiple parent assets (the Location box will be dimmed and unusable).

When editing a design/interface in the Designer app, the Details section lets you configure whether geometry is required and the allowed types.
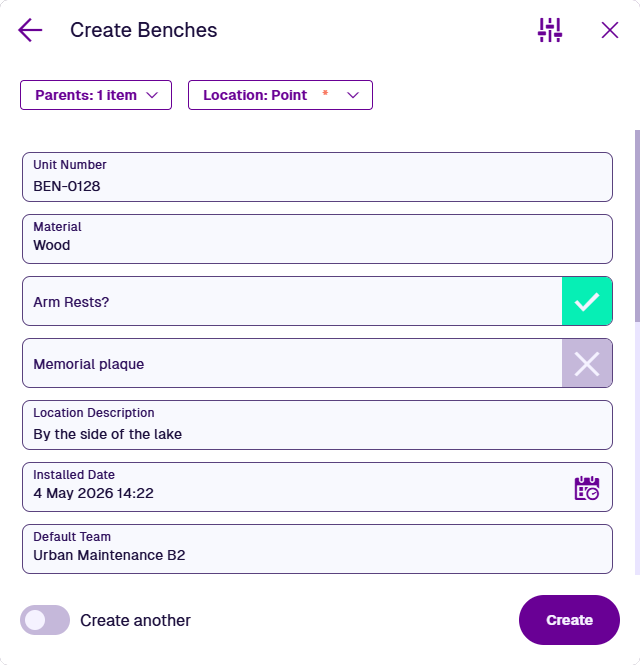
Attributes
By default, all attributes are displayed in the order they were added to the new item's design. Alternatively, the layout and visibility of attributes may be determined by an item form (see Advanced settings above).
Some attributes may be pre-populated with a default value. Required attributes are marked with an asterisk *. They must have a value set in order to continue. The only exception is if you're creating a template item, because those attributes will be filled in when creating an item from the template!
Select an attribute field to edit its value. Depending on the attribute type, you can either type directly into the field, or a specialised picker will appear to let you choose one or more values.
Details
| Icon | Type | Description | Input Method |
|---|---|---|---|
| AQS | Store an AQS query in JSON format | Build a query in the AQS Builder | |
| Date | Store a date value, e.g. 30 April 2024 | Select a value with the calendar picker | |
| Date Time | Store a date and time value, e.g. 2 July 2025 13:30:00 | Select a value with the calendar picker | |
| Geometry | Store geometry coordinates in GeoJSON format | Draw points, lines or polygons using the Geometry Editor | |
| JSON | Store JSON code | Type into a fullscreen JSON Editor | |
| Link | Store the IDs of items of a specific design/interface | Select one or more items with the item picker or map picker | |
| Number | Store a number value, e.g. 256, 3.1415 | Type directly into the field | |
| Seasonal | Store a date without a year, e.g. 25th December | Select a value with the calendar picker | |
| Text | Store a text value, e.g. I love managing my assets with Causeway | Type directly into the field | |
| Time | Store a time value e.g. 14:20:55 | Select a value with the calendar picker | |
| Yes/No | Store a boolean value, e.g. true or false | Toggle the field to enable or disable it |
Calculated attributes are never displayed (e.g. Job Number). Read-only attributes are not displayed by default but may be included on an item form.
Finish the process
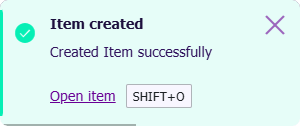
After completing the relevant steps for your item, select Create to finish. A notification indicates whether the item was created successfully or failed due to error.
The details of the new item will be displayed. If Open on create was enabled in Advanced settings, the new item will be opened in a new browser tab instead.
Create multiple items
To keep creating items similar to the first, ensure Create another is enabled at the bottom before creating the first. The Item Creator will stay open with all existing values intact, which you can change as needed for each subsequent new item.
If you need to create lots of items of a particular design, consider storing the attribute data in a CSV file and importing it. To learn more, see Gateway in Asset Classic.
For more complex scenarios, you can build workflows that perform Create actions according to various conditions, which can be triggered automatically or on demand. To learn more, see Workflows in Asset Classic.