Asset designs
Represent your physical assets
CausewayOne Asset Management provides the tools you need to monitor and maintain assets across all service areas. Visualise your assets on the map, use activities to plan and perform maintenance, and generate reports to capture snapshots of asset data.
To get started, you need to represent your assets in CausewayOne Asset Management:
-
Create a design for each type of asset that you manage.
-
On each asset design, add attributes for the data points you want to record for that asset type. This may involve implementing interfaces to inherit their attributes alongside the ones on the design.
-
Create items of asset designs to represent actual assets.
Create an asset design
To create a design that represents a type of asset:
-
On the start screen, select Create design. If one is already open, select Create design in the top-right corner instead.
-
Choose the Asset design type.
-
Fill in the details and then select Create design.
You can then edit the design to manage its attributes, links and other properties.
If you're unable to create a design, your user account may lack the required permissions.
Standard asset design details
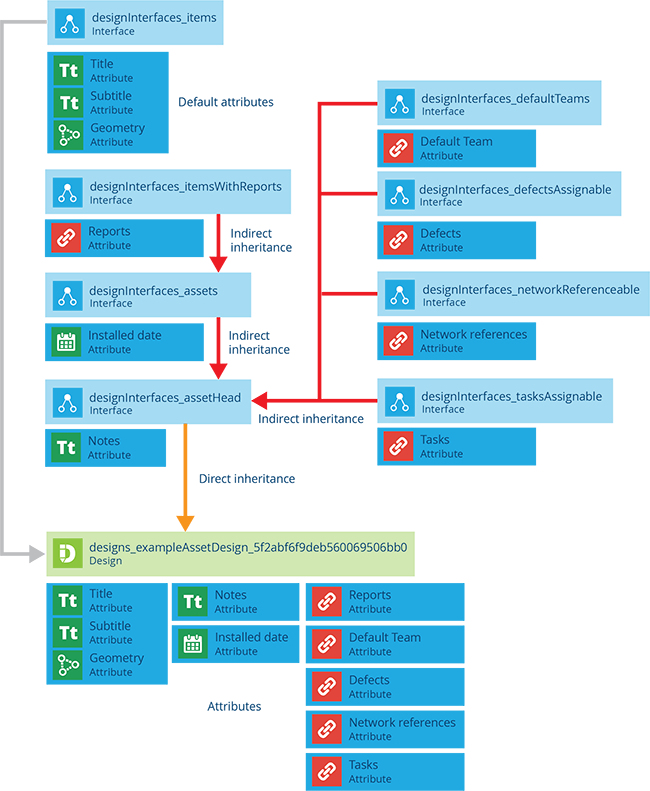
All asset designs implement the Asset Heads interface. Therefore, all asset items inherit a standard set of properties and attributes. Required attributes are marked with an * asterisk.
Details
If left blank or unchanged, the asset design will inherit the following properties:
-
Collections - asset items can belong to the Live or Archive collections.
-
Geometry - is optional and all geometry types are allowed.
-
Icon -
icon-structure-base -
Colour -
#690095
Attributes
The following attributes are inherited from the implemented interfaces:
-
Notes - miscellaneous information about the asset.
-
Installed Date - when the asset was installed at its location and entered into service.
Link attributes
The following Link attributes are inherited from the implemented interfaces:
-
Reports - links to any generated reports involving the asset.
-
Tasks - links to any inspections or jobs involving the asset.
-
Network References - links the asset to one or more positions within a network via network reference items.
-
Default Team - links to the team directly responsible for the asset.
-
Defects - links to any defects involving the asset.
Interfaces
The following interfaces are inherited directly:
- Asset Heads
The following interfaces are inherited indirectly via the above interfaces:
-
Assets
-
Items with Reports
-
Tasks Assignable
-
Network Referenceable
-
Default Teams
-
Defects Assignable
Diagram
Asset Groups
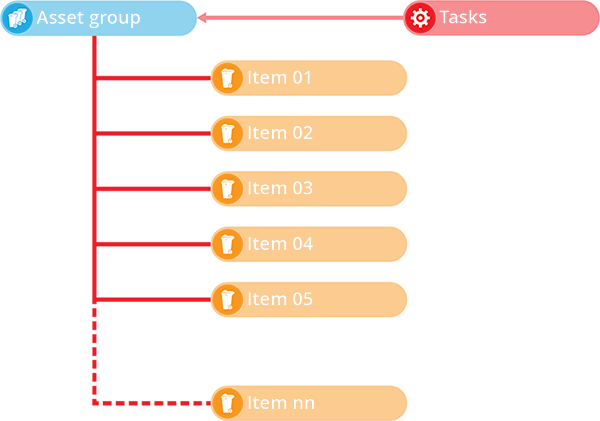
There are various ways of working with multiple assets in CausewayOne Asset Management. You can select them in the Maps app, or in an item picker, or create a query in the Data Explorer that lists assets matching certain criteria.
However, an asset group lets you define a specific set of asset items. This provides a handy reference point that you can use throughout CausewayOne Asset Management to address those assets collectively, e.g. creating a layer or activity that pinpoints just those assets.
Create an asset group design
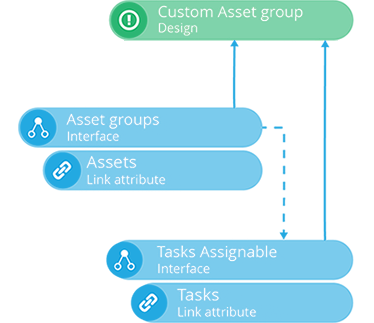
To create an asset group, you need at least one design that implements the Asset Groups interface. Some modules contain pre-made ones, e.g. the Waste module contains a Waste Groups design.
If necessary, create one:
-
On the start screen, select Create design. If one is already open, select Create design in the top-right corner instead.
-
Choose the Custom design type. Fill in the details and then select Create design.
-
When the new design opens, scroll to the Interfaces section and select Add interface.
-
Choose the Asset Groups interface from the list.
Your custom design now implements the Asset Groups interface, and by extension the Tasks Assignable interface, inheriting attributes from both.
Create an asset group item
To define an asset group, create an item of an asset group design:
-
On the start screen, select Designs and open an asset group design.
-
Select Create item in the top-right corner and choose the asset group design.
-
Fill in the following fields, along with any others the design has:
-
Name * - enter a distinct name that clearly identifies the new asset group.
-
Assets - use the item picker or map picker to select the assets you want to group together.
-
Tasks - select any existing inspections/jobs that apply to your new asset group.
-
-
Consider populating Location, so that the asset group can be represented on the map.
-
Select Create to finish.
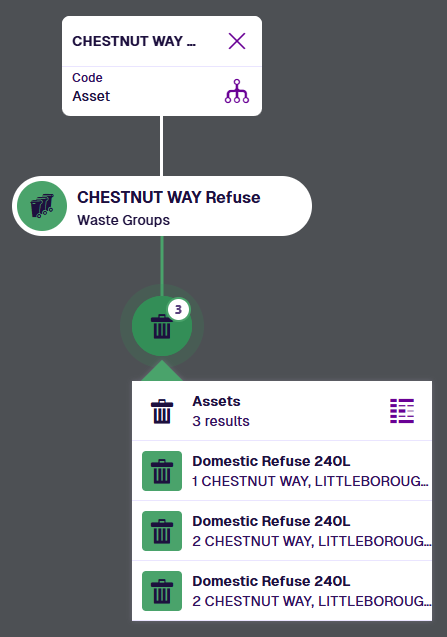
View an asset group item
When viewing an asset group item, you can display its assets in multiple ways.
In the General section, find the Assets attribute and select its Data Explorer button to list the grouped asset items in the Data Explorer app.
If available, the Graph View section can also provide an interactive visual representation of the grouped asset items.
Asset Components
Many types of asset have component parts that require their own management and maintenance. You can represent these in CausewayOne Asset Management too, by creating distinct component designs and items.