Titles and subtitles
Configure the primary and secondary labels of items
All designs/interfaces have Title and Subtitle properties. These act as templates that determine the primary and secondary labels of the items created from each design. They're fully customisable, letting you define exactly how items are identified and what data is surfaced.
Default labels
If Title and Subtitle are left blank on a design (and on any interfaces it implements), items of that design will display their Item ID as their title and the design name as their subtitle.

Fixed labels
If you enter text for both properties, all items created from the design will have the same title/subtitle. This may be preferable for some scenarios. In the example below:
-
Title is set to
Traffic Bollard -
Subtitle is set to
Type 2 Solar

Variable labels
The magic starts when you include variables in these properties! Using the Title/Subtitle Editor, you can configure both properties to include specific item attributes and display their values.
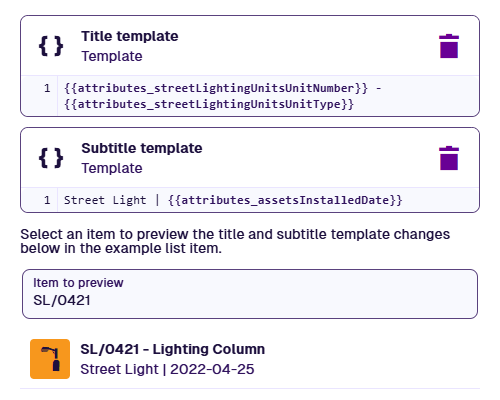
In the example below:
-
Title is set to
{{attributes_streetLightingUnitsUnitNumber}} -
Subtitle is set to
{{Type: attributes_streetLightingUnitsUnitType}}
All items of the design will have a unique title and a varying subtitle. This makes it easy to identify an item and see key attributes at a glance, without having to open it.

Using the Title/Subtitle Editor
When editing a design/interface, select Title or Subtitle in the Details section to open the Title/Subtitle Editor, and then type within the relevant template.
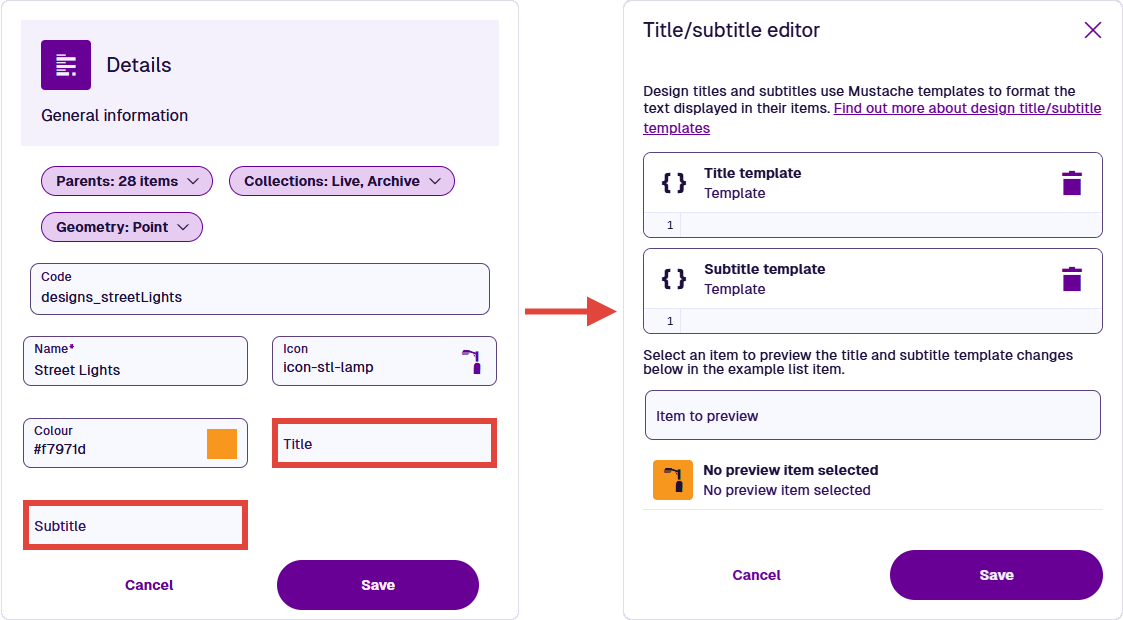
Title and Subtitle are technically attributes inherited from the default Items interface.
Attribute variables
To include attribute values in the title/subtitle, type two curly brackets {{ into the relevant template. The editor will display a list of available attributes on the current design. Keep typing to narrow down the name. Select an attribute to add its code to the template.
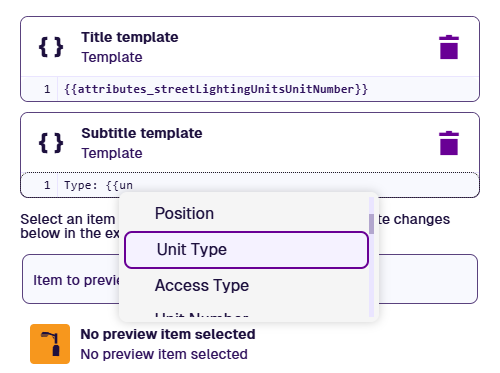
Due to their nature, Link attributes can behave differently depending on their contents.
Link attributes
If you select a Link attribute in the list, its appearance will vary. For items with one item stored in that Link attribute, the variable will display the stored item's title. Otherwise, the variable will display the number of stored items.
For example, if we add the Jobs attribute to the subtitle template of the Street Lights design, see how it can appear on different items.

Parent Link attributes
Further down the list, you'll see parent Link attributes that either connect to the current design, or to an interface it implements. A parent Link attribute may be located on a single design, or on an interface that's implemented by multiple designs.
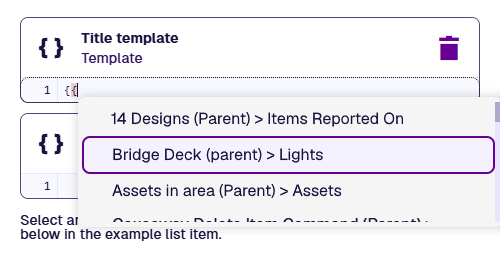
If you select a parent Link attribute, its appearance will vary. If an item has one parent item linking to it via that attribute, the variable will display the parent item's title. Otherwise, the variable will display the number of parent items.
For example, the Bridge Deck design has a Lights attribute that links to the Street Lights design. See how adding it to the title template of the Street Lights design can affect its items.

The format of a variable
The editor accepts variables written in Mustache template format. A typical variable consists of an attribute code enclosed in double curly brackets:
-
a system attribute:
{{attributes_streetLightingUnitsUnitNumber}} -
a custom attribute:
{{attributes_bollardType1BollardType1_5caef948ff5c130f7075f0e5}}
You can include a mixture of text and variables:
Type: {{attributes_streetLightingUnitsUnitType}} / {{attributes_colouredStreetLightsColour}}
Conditional statements
Conditional statements let you include variables/text only if certain conditions are true.
There are three types of condition that can be checked:
-
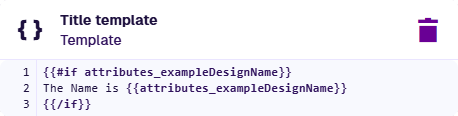
Does the specified attribute have data?
{{#if attributes_exampleDesignName}} -
If the specified attribute is a boolean type, is it Yes rather than No?
{{#if attributes_exampleDesignYesNo}} -
Does the item belong to the specified collection?
{{#if collection_archive}}
There are three types of statement that you can use to check those conditions.
IF statements
An IF statement lets you say: "If this condition is true, output this".
-
Type the condition (what to check):
{{#if attributes_exampleDesignName}} -
Type the statement (what to output if true):
The Name is: {{attributes_exampleDesignName}} -
Type
{{/if}}to close the statement.
If the Name attribute has data, output 'The Name is: Name'.
ELSE statements
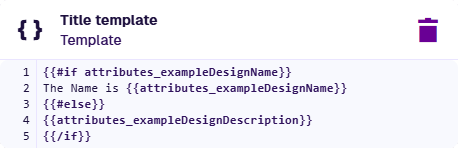
An ELSE statement lets you say: "If this condition is true, output this. Otherwise, output this."
To do this, add an #else statement before the final {{/if}}:
{{#else}}{{attributes_exampleDesignText}}
If the Name attribute has data, output 'The Name is: Name'. Otherwise, output the Description attribute.
ELSEIF statements
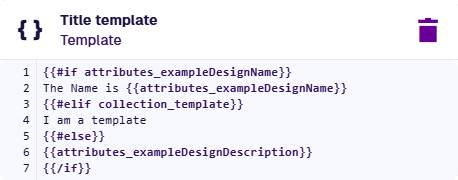
An ELSEIF statement lets you chain IF statements together.
To do this, add an #elif statement after the first #if statement:
{{#elif collection_template}}
I am a template
If the Name attribute has data, output 'The Date is: Name'. Or if the item is in the Template collection, output 'I am a template'. Otherwise, output the Description attribute.
Preview your changes
To preview how items will look, select Item to preview, and then choose an existing item of the current design. Any changes you make to the title/subtitle templates will be reflected in the preview beneath.
Update existing items
Select Save to finish. Your changes will apply to all new items created from the design.
Existing items will be updated the next time they're edited, either by a person or a system process. To update them all immediately, you can perform a bulk action to Touch them (resave them with no changes).