Edit the access policy
Configure its conditions and user groups
After you create or open an access policy, the Access Policy Builder will appear. Use this tool to define the rules of the policy and the user groups they apply to. Don't forget to select Save when you're done!
Remember, access policies are supplementary to pol
Using the Access Policy Builder
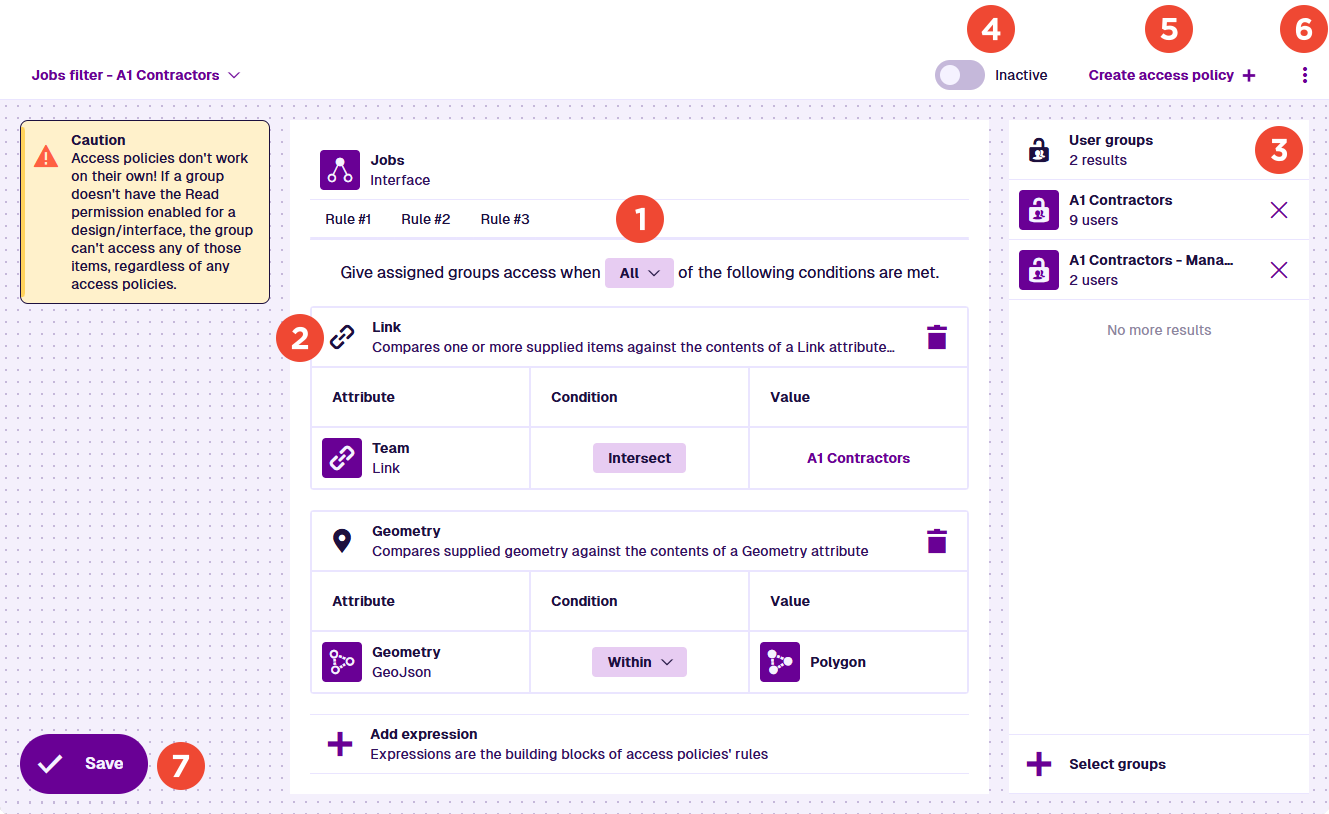
1 Rules
An access policy can have one or more rules. All rules must be fulfilled for read access to be granted to an item of the targeted design/interface. If the policy has multiple rules, use the top tabs to switch between them and view their details.
Each rule targets a set of user groups and has one or more expressions that define its conditions. Choose one of the following behaviours:
-
All - each and every expression must be fulfilled to fulfil the rule.
-
Any - at least one expression must be fulfilled to fulfil the rule.
2 Expressions
Use expressions to define the conditions of the current rule. An expression compares an item attribute against one or more values. If the expression is fulfilled for a particular item of the targeted design/interface, read access will be granted to that item (unless the rule requires All expressions to be fulfilled).
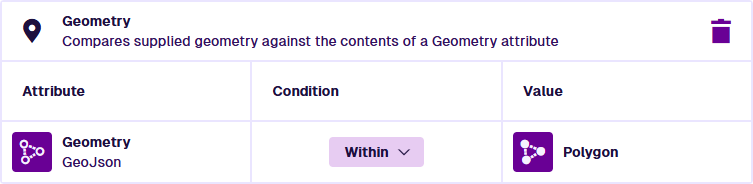
For example, to restrict access to items based on their location, you can add an expression that checks if their Geometry attribute value is located within the specified polygon. This will grant access to items in the area and deny access to items outside the area.
To add an expression to the current rule, select Add expression. Choose an expression type from the list and then configure its columns as needed. To delete an existing expression, select its button.
To learn more, see Access policy expressions.
3 User groups
Apply the current rule to one or more groups. This will affect users belonging to those groups directly and indirectly (via a role). They will receive read access to some items of the targeted design/interface, according to the conditions defined by the rule's expressions. They will be denied access to the remaining items (unless granted by another rule or access policy).
To add user groups to the rule, select Select groups and choose one or more from the list. To remove a user group from the list, select its button.
Ensure the selected groups have the Read permission enabled for the target design/interface. Otherwise, they won't be able to access any of its items, regardless of any access policies! See Permissions Explorer.
4 Inactive / Active
Use the switch in the app bar to enable or disable the access policy. New access policies are Inactive by default. When switched to Active, the access policy is enforced with immediate effect.
Be aware, enabling an access policy can potentially block access to many items the user groups could access before. Therefore, we recommend testing beforehand and informing users of changes as needed.
5 Create
To create a new policy, select Create access policy in the app bar. You'll be prompted to save any changes to the current one before continuing.
To learn more, see Create or open an access policy.
6 Access policy actions
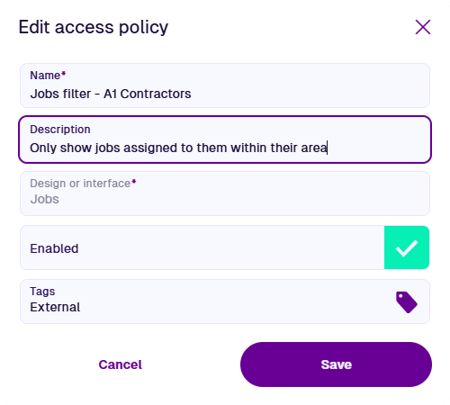
To edit the policy's properties, open the Access Policy Menu in the app bar and choose Edit access policy :
-
Name * - enter a distinct name for the access policy.
-
Description - enter a description of how the access policy works. This will be displayed in its subtitle for easy identification.
-
Design or interface * - choose the design/interface that the access policy will target.This can't be changed after creation! -
Enabled - make the access policy active. We recommend leaving this disabled until you're happy with its configuration!
-
Tags - use the Tag Manager to select or define any custom tags that are relevant to the access policy. This provides a way to filter available access policies when searching for them.
Select Save to finish.
To delete the access policy, open the Access Policy Menu in the app bar, choose Delete access policy and answer yes to the confirmation.
Deletions can't be undone, so please think carefully before doing so!
7 Save button
When you're finished, select Save in the bottom-left corner to save your changes. To leave without saving, select Permissions in the top-left corner to return to the start screen.