Stencil Editor
Customise how items are displayed
Overview
An item's attributes are defined by its design and display in the order they were added. To change the order and visibility of those attributes when viewing items of a particular design, you can edit the design's stencil.
This is particularly useful for customising the system designs included with CausewayOne Asset Management. To ensure system designs work consistently for everyone, it isn't possible to remove any of their attributes (though you can add custom attributes). Editing a system design's stencil lets you hide the unwanted attributes instead!
Additionally, a stencil can display multiple representations of the same attribute. For example, an item's Geometry attribute can be displayed as a polygon, in plain text, and as a Google Street View link.
Accessing the Stencil Editor
To access the Stencil Editor:
-
Select a design to view its details in the right panel.
-
If necessary, use the tab bar to select the General page.
-
Select More in the action bar and choose Edit stencil.
Understanding the Stencil Editor
A stencil is made up of controls. Each control represents a single attribute. By default, a stencil contains one control for each of the design's attributes.

The image below illustrates the relationship between attributes in the design, controls in the stencil, and how an item of that design is displayed in the right panel.
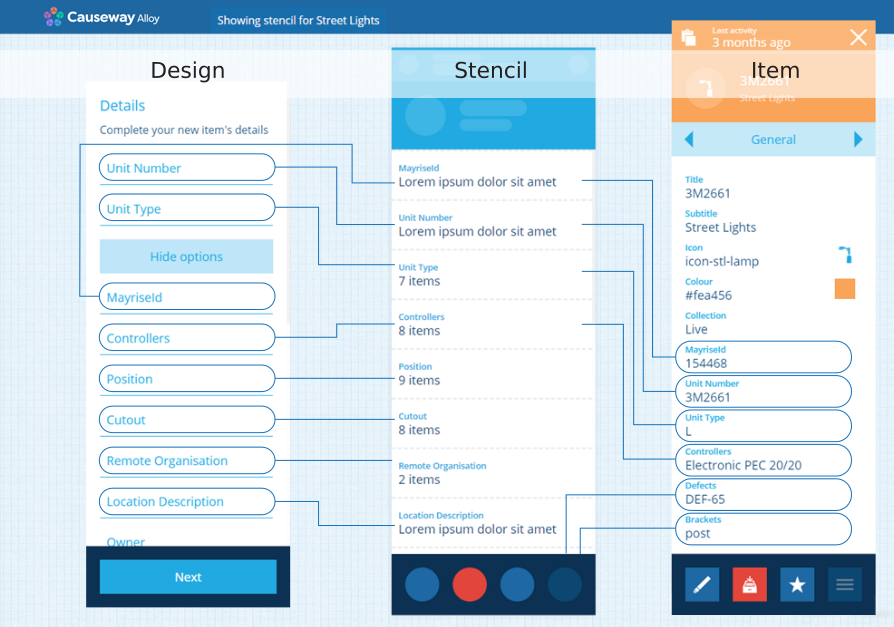
Note that Title, Subtitle, Icon, Colour and Collection are always shown for all items and can't be modified by the Stencil Editor.
For all other attributes in the design, the stencil acts as an overlay that lets you hide individual attributes or change the order they appear in when an item is displayed. You can also add controls to display non-attribute data, such as an online image or a URL.
Editing a stencil doesn't change the design itself and you can always reset it back to default if needed.
Menu actions
To access these actions, select Menu in the bottom-right corner:
-
Add control - insert a new control beneath the currently selected one.
-
Reset stencil - revert back to the default list of attributes in the default order.
-
Save stencil - save your changes. The stencil will be applied when viewing any item of the design.
Item forms vs stencils
Item forms and stencils both let you customise the order and visibility of an item's attributes.
However, they differ in a few key ways:
| Item form | Stencil | |
|---|---|---|
| Used for... | Inputting data | Viewing data |
| How many can a design/interface have? | Many | One |
| Can it include multiple controls for a single attribute? | No | Yes |
| Can it pull in non-attribute data? | No | Yes (e.g. Street View control) |
Therefore, item forms and stencils serve different purposes and can be used together without conflict.