Using the Title/Subtitle Editor
Define a template for item titles and subtitles
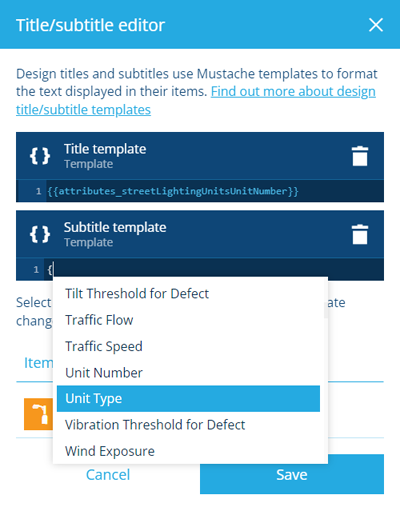
An item's title/subtitle is determined by its design. When editing a design, select the Title or Subtitle field to display the editor, and then type within the relevant template box.

Attribute variables
To display one or more attribute values in the title/subtitle, add them as variables to the relevant template.
To add a variable, type the first curly bracket {. The editor will display a list of attributes within the current design. When you select one, the editor will autocomplete the variable for you.
Link attributes
If you select a Link attribute, its appearance will vary. For items with exactly one item stored in that Link attribute, the variable will display the stored item's title. Otherwise, the variable will display the number of stored items.
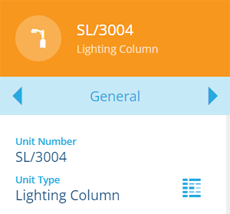
For example, see how adding the Defects attribute to the subtitle template of the Street Lights design can affect its items.

Parent Link attributes
Further down the list, you'll see parent Link attributes that either connect to the current design, or to an interface it implements. A parent Link attribute may be located on a single design, or on an interface that's implemented by multiple designs.
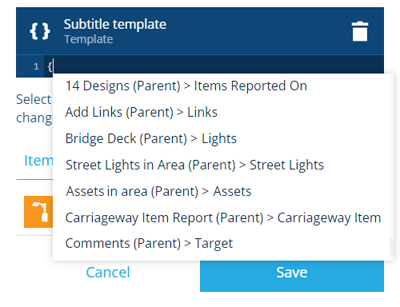
If you select a parent Link attribute, its appearance will vary. If an item has exactly one parent item linking to it via that attribute, the variable will display the parent item's title. Otherwise, the variable will display the number of parent items.
For example, the Bridge Deck design has a Lights attribute that links to the Street Lights design. See how adding it to the title template of the Street Lights design can affect its items.

The format of a variable
The editor accepts variables written in Mustache template format. A typical variable consists of an attribute code enclosed in double curly brackets. For example:
-
a standard attribute:
{{attributes_streetLightingUnitsUnitNumber}} -
a custom attribute:
{{attributes_bollardType1BollardType1_5caef948ff5c130f7075f0e5}}
You can also combine text together with a variable. For example:
Unit Number: {{attributes_streetLightingUnitsUnitNumber}}
Conditional statements
Conditional statements let you include variables/text only if certain conditions are true.
There are three types of condition:
-
Does the specified attribute have data? For example:
{{#if attributes_exampleDesignNameField}} -
If the specified attribute is a boolean type, is it Yes rather than No? For example:
{{#if attributes_exampleDesignYesNoField}} -
Does the item belong to the specified collection? For example:
{{#if collection_archive}}
IF statement
An IF statement lets you say: "If this condition is true, output this."
-
Type the condition (what to check). For example:
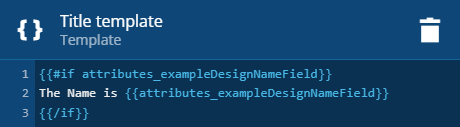
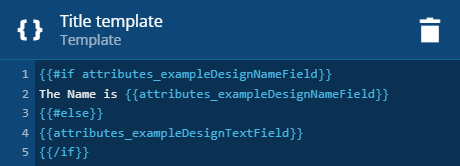
{{#if attributes_exampleDesignNameField}} -
Type the statement (what to output if true). For example:
The Name is: {{attributes_exampleDesignNameField}} -
Type
{{/if}}to close the statement.
If the NameField attribute has data, output 'The Name is: NameField'.
ELSE statement
An ELSE statement lets you say: "If this condition is true, output this. Otherwise, output this."
To do this, add an #else statement before the final {{/if}}. For example:
{{#else}}{{attributes_exampleDesignTextField}}
If the NameField attribute has data, output 'The Name is: NameField'. Otherwise, output TextField.
ELSEIF statement
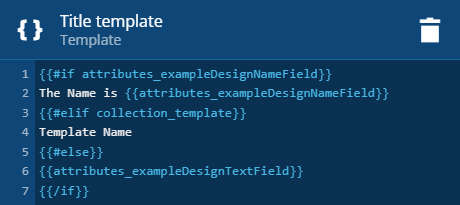
An ELSEIF statement lets you chain IF statements together.
To do this, add an #elif statement after the first #if statement. For example:
{{#elif collection_template}}
Template Name
If the NameField attribute has data, output 'The Date is: NameField'. Or if the item's in the Template collection, output 'Template Name'. Otherwise, output TextField.
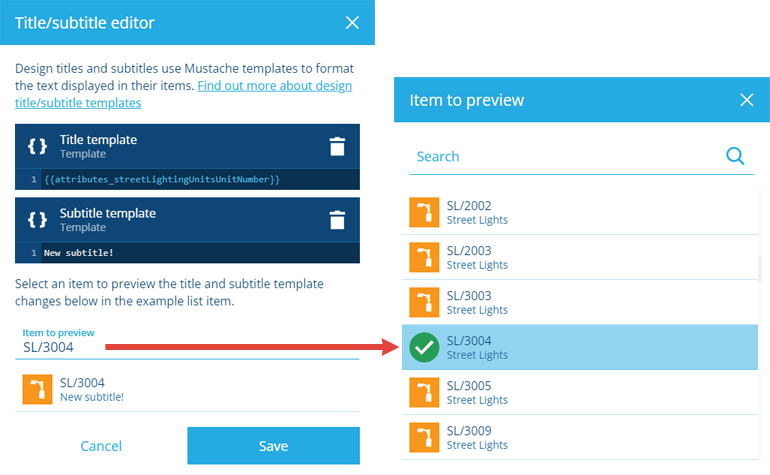
Preview your changes
To preview how items will look, select Item to preview, and then choose an existing item of the current design.
Any changes you make to the title/subtitle templates will now be reflected in the preview beneath.
After saving your changes, remember to update existing items by performing a Touch on them, see Bulk actions.
Find an attribute code
Sometimes, you need to enter an attribute code manually. To find it and copy it to the clipboard:
-
Open the relevant design and view its details.
-
Use the tab bar to switch to the Attributes tab, and then select the relevant attribute.
-
On the attribute's General tab, double-select its Code field to copy it.
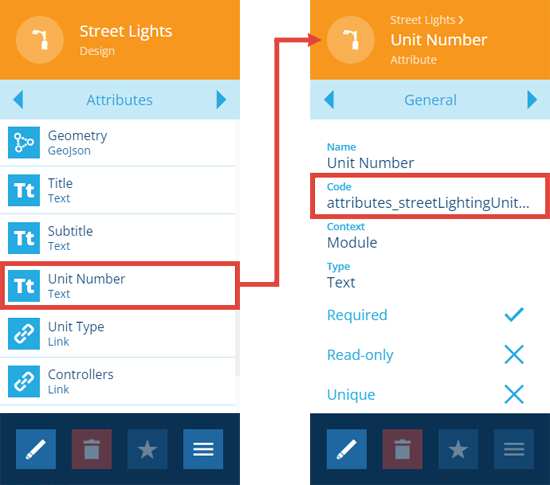
You can then return to the design, open the Title/Subtitle Editor as above, and then paste the copied attribute code into the Title or Subtitle box.
Remember, you must surround the code with curly brackets {{ }} to make it a variable!