Editing item geometry
Put an item on the map
When creating or editing an item, you can define its geometry. This makes it possible to visualise the item alongside other items on the map.
The Geometry Editor lets you draw points, lines and polygons directly onto the map to represent the item's location and shape. Alternatively, you can import coordinate data from elsewhere. The item's design determines which geometry types are allowed to be set.
To edit the geometry of an item:
-
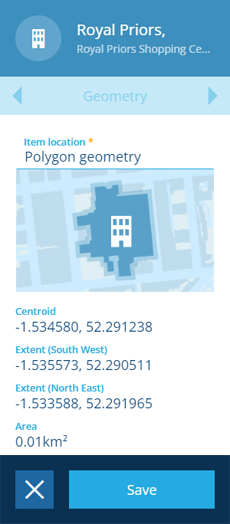
Select the item to view its details.
-
Use the tab bar to switch to the Geometry tab.
-
Select Edit in the action bar.
-
Select the Item location box to open the Geometry Editor.
In CausewayOne Asset Management, all geometry is saved using the WGS84 Lat/Lng (EPSG:4326) coordinate system.
If the active basemap uses another coordinate system, item geometry is automatically transformed (by us or the map service) to keep things in proportion. As a result, item geometry may appear slightly misaligned with the basemap.
Therefore, switch to the most relevant basemap before editing an item's geometry, so you can draw directly over the basemap's features as needed.
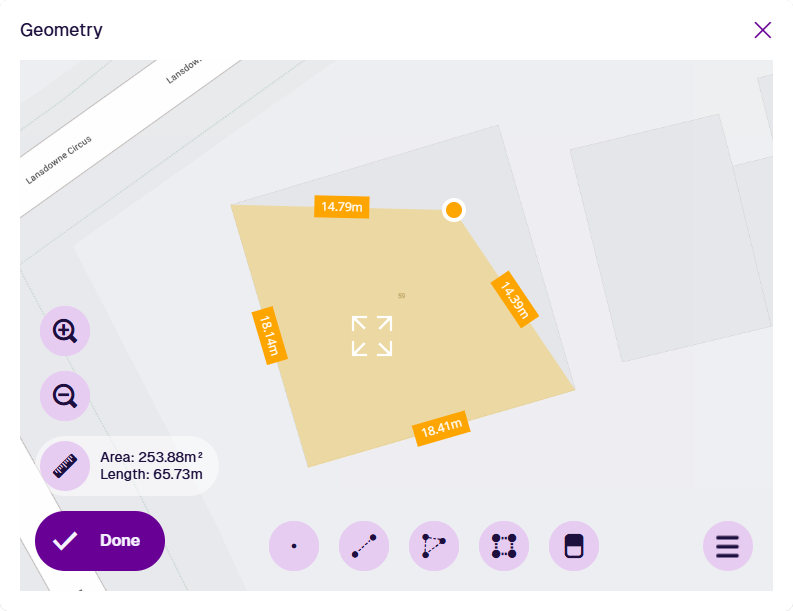
Using the Geometry Editor
1 Map
The Geometry Editor displays a map area, similar to the Maps app and classic workspace. By default, it uses the same basemap imagery and doesn't show any layer data.
If the item or data field you selected contains any existing geometry, the map will automatically centre on its location. The distance between each connected point of geometry is shown for scale.
2 Map tools
Use these tools to zoom in and out of the map (as an alternative to scrolling). The Measure tool shows the total area and length of all polygons and lines in the current geometry.
Drag the map itself to pan around it. To learn more about map navigation, see Map tools.
3 Draw tools
Use these tools to draw different types of geometry on the map:
-
Point - select a single location.
-
Line - select multiple points to draw a line through them all. Select the last point twice to finish.
-
Polygon - select multiple points to draw a closed shape. Select the last point twice to finish.
-
Box - select two points to draw a box shape between them.
-
Erase - when this tool is selected, all geometry points will appear as orange circles . Select a point to remove it from the current geometry. Deselect the tool to finish.
The availability of these tools depends on the allowed geometry of the item's design. If they aren't displayed at all, the Geometry Editor is in read-only mode.
4 Menu actions
For more actions, select Menu in the bottom-right corner:
-
Clear all - remove all geometry points.
-
GeoJson view - edit the current geometry's underlying GeoJSON code. This lets you tweak the coordinates or paste in code from elsewhere. The editor will highlight any errors in the modified code.
-
Show/hide basemap panel - select a different basemap to change the background imagery of the map. This is only temporary and doesn't affect the active basemap used throughout CausewayOne Asset Management.
-
Show/hide GeoJSON - view the current geometry's GeoJSON code alongside the map.
-
Show/hide layers - show the items of any layers that are currently enabled on the main map.
-
Snap layers - choose one of the shown layers to act as the snap layer. As you draw geometry, your pointer will automatically snap to the nearest point or line on the snap layer as you approach it. This makes it easy to plot geometry precisely alongside another item's geometry, e.g. a building connected to another building, a road branching off from another.
5 Basemap / GeoJSON panel
If Show basemap panel is selected in the menu, this side panel displays a list of available basemaps. Select one to temporarily change the background imagery of the map.
If Show GeoJSON is selected in the menu, this side panel displays the GeoJSON code of the current geometry. This makes it easy to copy the code for use elsewhere. To edit the code, select GeoJson view instead.
To hide the side panel, open the Menu and select the relevant Hide action.
To always use a specific basemap when viewing items of a specific design/interface, create an item canvas view with a configured Map section.
6 Done button
When you're finished, select Done to save your changes. To leave without saving, select in the top-right corner.
How to draw
Use the draw tools to plot different types of geometry. If a tool appears dimmed, no additional geometry of that type can be added. To learn more, see Geometry types.
Point
Select the Point tool and then select your desired location on the map.
Once a point is selected, the Point tool becomes dimmed to indicate that no further points can be added. To reposition the point, drag it to another location, or use the Erase tool to remove it and start again.
Select Done to save your changes.
Line
Select the Line tool and then select a starting point on the map. Continue selecting points along your desired line. If you need to track a fine curve, select as many points as possible along it! To finish drawing, double-select the final point.
Once a line is finished, the Line tool becomes dimmed to indicate that no further lines can be added.
To edit the line, select an existing point (your mouse will snap to it) and drag it to a different position. To add a new point, select and hold anywhere along the line, and then drag the new point into position! Use the Erase tool to remove points as needed.
Select Done to save your changes.
Polygon
Select the Polygon tool and then select a starting point on the map. Continue selecting points along your desired shape. If you need to track a fine curve, select as many points as possible along it! To finish drawing, double-select the last point (or select the starting point again).
Alternatively, you can use the Box tool to draw a rectangle between two diagonal points.
Once a polygon is finished, the Polygon tool becomes dimmed to indicate that no further polygons can be added.
To edit the polygon, select an existing point (your mouse will snap to it) and drag it to a different position. To add a new point, select and hold anywhere along an edge, and then drag the new point into position! Use the Erase tool to remove points as needed.
Select Done to save your changes.
Edit a line or polygon
Lines and polygons are comprised of multiple connected points. Your mouse pointer will "snap" to a nearby point if it gets close. To move an existing point within a line or polygon, simply drag it to a new position.
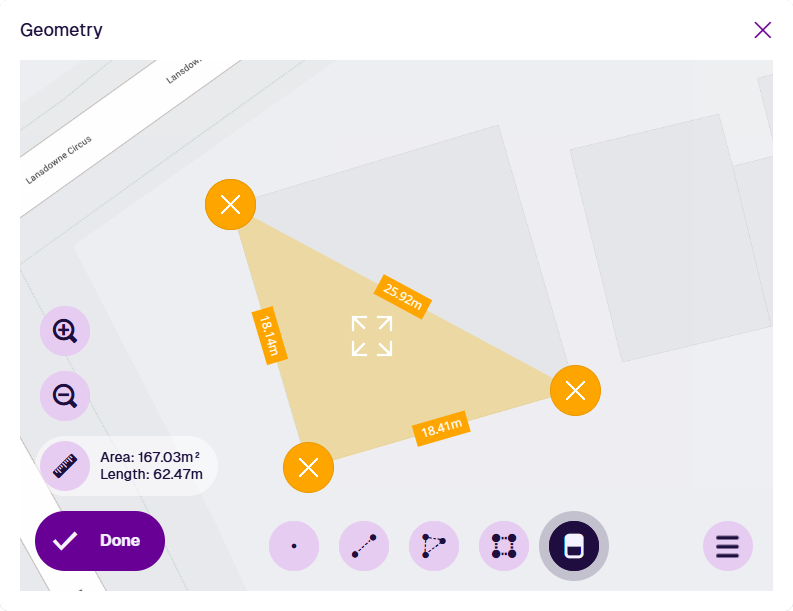
Remove points
To start removing points, select the Erase tool. All points in the current geometry will appear as orange circles .
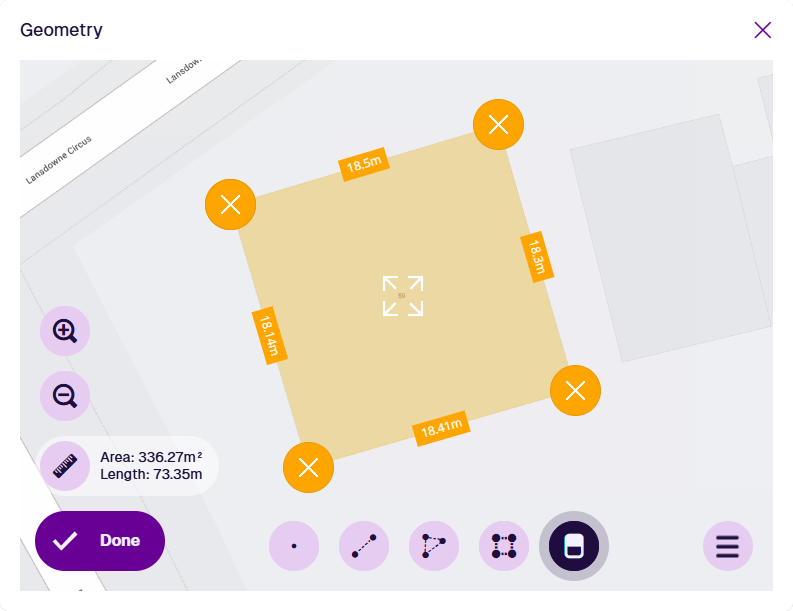
Select any orange circle to remove that point from the current geometry. When you're done, deselect Erase to finish.
Add points
To add a point to an existing line or polygon, select and hold anywhere along one of its edges, and then drag the new point to the desired position.