Manual workflow reference
Perform a manual workflow and use its output
Use a manual workflow reference (MWR) to perform a specific manual workflow during the current workflow. Any items from the previous node will pass to the manual workflow. Any items output by the manual workflow will pass to the next action in the current workflow.
Unlike other workflow actions, MWRs require some preparation before they can be used! This involves creating a unique trigger parameter design for the relevant manual workflow, and configuring the workflow's actions to receive the relevant parameter values. Currently, this requires using the Alloy API. To learn more, see Manual workflow references in the Developer Docs.
Prepare a basic MWR
If you just want to trigger a manual workflow without providing any parameter values, you can do the following:
-
Create a design and make it implement the Workflow Manual Trigger interface.
-
Edit the properties of the manual workflow and switch to the Trigger tab.
-
Set the following trigger properties:
-
Output action - choose the action in the manual workflow that will provide the final output of the MWR.
-
Parameters design - choose the design you created. Ensure no other manual workflow uses the same design!
-
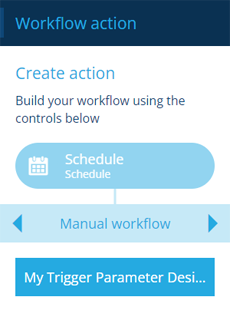
Once a MWR has been prepared, its parameter design will be listed in the Manual workflow tab in the left actions panel.
Details
| Icon | Action | Description | Availability | Input | Output |
|---|---|---|---|---|---|
| Same as parameter design | Manual workflow reference | Perform a manual workflow during the current workflow | If the manual workflow has a unique parameter design set | Item(s) from the previous node | Item(s) output by the manual workflow |
Configuration
To configure a MWR when building a workflow:
-
Add a new action and choose the relevant parameter design from the dashboard panel. Alternatively, select an existing MWR, and then select Edit in the action bar.
-
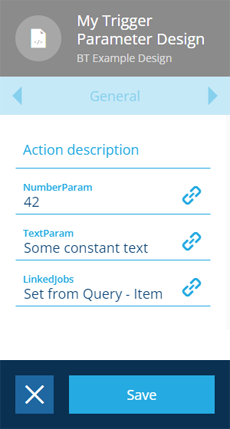
In the right panel, the attributes of the parameter design will appear (if they have the ActionParameter tag set).
Fill in each attribute field as needed. Any values you specify here will be used by the manual workflow's actions. Hopefully, the name of each attribute describes how its value will be used! If in doubt, contact the manual workflow's author (check the Failure notification tab for an email address).
If any required attributes are left blank, users will be prompted to provide values at runtime.
-
Select Save to finish.
Dynamic values
Fields marked with can accept a dynamic value:
-
Constant - select or enter static values.
-
Offset - set a date/time relative to when the workflow triggers.
-
Link - link to the corresponding output of any preceding stage in the current branch path (one item).
-
Output - reference the total output of any action in the sequence (one or more items).
If an action attribute displays as <<Computed>>, its value is determined by the output of a workflow computation. If you enter a new value and save, the computation will be overwritten!